Sunday, March 27, 2011

Color Muse

I've been wanting to bring that POP of color into our very gray bedroom so I've been searching high and low for the perfect throw pillow to be my "color muse". In other words, the thing around which all the rest of my color decisions are made. I wanted something teal and yellow-orange, but I've searched just about every place I can think of and nothing is quite right. Here are a few almosts:

From Amazon.com
From Home Centric on Etsy (they have some of the most gorgeous pillows)
From Zgallerie

But on my recent trip to Ross, I found this stunning little vase that was just perfect.


The combination of orange and teal is exactly what I've been looking for in a pillow but, alas, could not find. This vase, however, is a great focus for getting all the other color accents together for the room. I wish I could take this with me whenever I go decor shopping, but for now it just sits on my nightstand looking perfect.


Pssst, it was only $8 from Ross. Score!

Bedroom Makeover Part 2: Curtains!

I was lucky enough to find some curtains that were the EXACT same gray color as the duvet at Target AND they were in the 94" height! I'm a huge fan of hanging curtains "high and wide" thanks to Young House Love, one of my favorite blogs. I positioned the curtains right up against the ceiling and about 1.5 feet out from each edge, and the result is pretty dramatic. It really makes the window look MUCH bigger than it is.
On to the pictures. Here's the BEFORE:
And the AFTER:

Doesn't that window just look enormous? Here are a few more BEFORE/AFTERs:
BEFORE
AFTER

You can see that we've made a few other improvements. Swapping out the black Expedit drawers for some nice cream colored ones (these great cloth bins are found at Target), adding a catch-all bowl for all my junk (snack bowl from CB2), general organization and cleanup, and finding a "color muse" (more on that here).
BEFORE
AFTER

We actually completely forgot we had another window by the door (since we literally NEVER touch it) and only bought one set of curtains/rods for the big window. Now that we've got curtains on the other one as well, it's pretty hard to miss!
BEFORE
AFTER

The curtains are a bit on the short side, but there's some extra length in the hem that I'll eventually let out to get them closer to floor-length.

We bought the double curtain rods because I'm thinking about adding some colorful sheers behind the gray curtains for a nice pop. It might involve some DIY curtain dying...stay tuned for that!

The corner above the computers was looking pretty dark, so I brought in some light by hanging a mirror that I nabbed from Ross for $18. It had a few chipped and bent edges, hence the price, but nothing that can't be touched up with a bit o' paint.

Now for the wall-makeover bill: $60 for two sets of curtains, $120 for curtain rods (we used 3 total) and $18 for the mirror. That brings us to $198 which is not cheap, but we think the results are completely worth it!

Next on the list is getting a curtain for that Pax wardrobe because it's starting to look really REALLY nastay compared to all of our nice improvements. And a new lamp, cuz that hanging lantern is just an eyesore.
SOON!

Friday, March 18, 2011

Couch Hunting

So one of the first pieces of furniture I went hunting for was the perfect couch. I had browsed Craiglist a bit, but decided that since I was supposed to be an adult, and because I get grossed out by other people's cooties, I should probably just bite the bullet and get something new. Based on my last experience with an overstuffed giant (comfortable, but huge) with a deep red couch slip-on cover that showed EVERY SINGLE ONE of Teako's white hairs, I came up with this criteria:
  • Modern clean lines
  • Light-colored
  • Comfortable
  • Easy to clean fabric
  • Affordable (less than $1200)
There were several that I had my eye on. I'm a huge fan of pretty much everything at CB2, so one day we wandered in and saw this sexy thing:

It was called "Avec" and cost $1200. So modern, so sleek! It was comfortable too, other than the tall armrests, which could be remedied with some pillows. It was also ready to go; we could take it out of the store that day! Only problem was that it came in one color: "pewter". Wah wahhhhh. The final nail in the coffin for this guy was when we took a cloth swatch home and rubbed it on Teako to see how the hair would pick up. It was practically a lint roller and showed the hair badly. NEXT!

We found this one at a few furniture stores. Sofa made by Rowe called "Berkeley" (how appropriate):

Definitely something I could go for! I love the gentle arc of the armrests. You can also choose your upholstery! The cost ran between $800 and $1000 depending on the fabric. Now for the downside: every store that had this for sale said it would take 3-4 months to be made and delivered. NEXT!

Continuing on, we found a huge sofa warehouse with lots of floor samples about 2 blocks away. They had so many different choices, but I finally found the one I loved called "Belas". It was very similar to the "Berkeley" with the arched armrests. I missed the tufted buttons in the back, but the pillows were much more comfortable. I chose a cream microfiber for easy cleaning and some retro-ish fabric for the complimentary accent pillows.
Luckily for me, the custom order would only take about a month to arrive... I could live with that. With the customizations, and hefty delivery fee, the final came out to $1100, just under my budget.

It was a nice surprise when I got a call that the sofa was ready two weeks after I had ordered it! Here it is all shiny and new and, of course, with Teako's stamp of approval.


I think what I love most about this couch is that Teako's hair is TOTALLY invisible on it! It's also really comfortable and soft. The tall arm rests make it a great place to lounge.


Now for a coffee table...probably my biggest project yet! Stay tuned!

Sunday, March 13, 2011

Hultet Clock Hack: In Honor of DST

The government is taking away that hour of sleep they gave you in November (though we do get back an hour of daylight; no more getting dark at 5:30 pm, yay!), so don't forget to change your clocks!

In honor of this day, I thought I'd share a recent Ikea hack of mine involving an 18" Hultet dish and a discontinued Ikea clock. This hack was featured on one of my favorite blogs, Ikea Hacker.

The Premise: I needed a nice clock for my bamboo-themed bathroom, but nothing seemed quite grand enough. Boyfriend happened to have an old round wall clock he had purchased from Ikea a few years ago (I forget the name of it now, it has since been discontinued). As fate would have it, I had also recently purchased a few bamboo Hultet dishes to hang in the bathroom as decoration. I got the idea to frame the too-small clock with one of the 18" dishes when I was storing the clock IN the dish during Boyfriend's move. It looked good...real good. But how to attach the two while still being able to access the battery on the back of the clock (or the knob to change the clock for DST)?

1. I figured out where to drill my holes based on where the hanger was on the back of the clock and where it aligned with my dish.

2. I flipped the dish over and drilled two holes from the back. I positioned the holes an inch or two higher than the location of the clock hanger so that gravity would pull the clock center with the dish.

My Makita drill is awesome!
3. I used a malleable wire (like frame-hanging wire) and strung it through the clock hanger. I threaded the two ends of the wire through the two holes I just drilled.


4. I used a leftover Ikea dowel (they sent me about 100 when I just needed 16 for my Pax wardrobe) to tie the wire to the dowel and used it to tighten the wire until the clock hung in the center of the dish.


5. I drilled another hole in the "lip" of the back of the dish based on where 12 o'clock was pointing.

6. I threaded a loop of hanging wire through this hole in order to hang it on a nail. I used another dowel to tighten this wire as well.


Here's the final product all hung 'n' stuff. I also used a bit of 3M velcro for picture hanging to secure it to the wall in case of an earthquake.


The cool thing about this hack is that if I need to change the time or batteries, I simply unwind the wire in the back and take off the clock! I guess I should go take care of that today at some point...

Saturday, March 12, 2011

Bedroom Makeover Part 1: The Duvet

Ok guys, this one is CURRENT! None of this backlog archive stuff. We're in the process of doing a serious bedroom makeover and here's why:
Gross, right? Wait, there's more:


I've had that comforter since high school, and while it started out clean and fluffy and trendy, now it's just flat, stained and depressing. I've been holding off on decorating the rest of the room until I got a comforter to be my design-cornerstone. After weeks and weeks of online and in-store shopping, Boyfriend and I finally agreed on this Solarized Duvet cover from West Elm. We coupled it with some dark gray sheets and a light cream bedskirt and got this:

So much better right? And since I think it's unfair when people take their "before" picture at night in awful lighting and the "after" picture in the day with beautiful lighting, here's a night time picture with same-as lighting:

Such a huge improvement, and it's SO comfy! We got a duvet insert from Overstock.com for $43. Since it never gets below 68 degrees here at night, we got a Serta Comforter level 1, which means it's got the least amount of stuffing. After one night it has proven to be not too warm, not too cold. Perfect! I'm not digging the cream bedskirt, but it's so hard to find bedskirts in a wide variety of colors. It will have to do for now.

COMING SOON: Curtains, throw pillows and stuff to hang on the walls!

Friday, March 11, 2011

Bar Stool Makeover

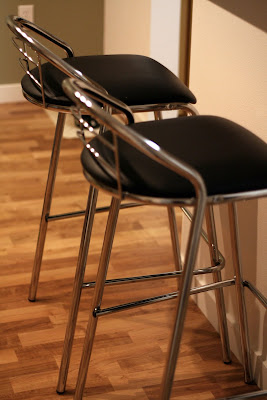
I had been on the prowl for a couple of bar stools for my kitchen island. I was super excited when I found these swanky things on Craigslist for $40 a piece. They had three so I figured I'd nab them all cuz you never know when you'll move to a bigger place with a longer bar (here's to hoping)! So for $120 (a little on the pricey side for CL) I managed to get these faux black leather bar stools:


The only problem was that black faux leather. It was black--which I'm trying to get away from after discovering how small it made my last apartment feel--and it was cheap-looking.

Armed with a nail gun borrowed from one of my co-workers (you never know when Pixar people will get the urge to drastically modify their offices) and a couple yards of chocolate brown microsuede from Joann's Fabric, a screwdriver and some pliers, I went to work.

First step was removing the seat cushion from the metal frame. This was as easy as unscrewing the four screws that held it in place. Then I flipped the cover over and carefully began prying out the staples with the needle-nose pliers, being careful not to rip the dust cover.

About mid-way through the de-stapling process
With the gross "leather" off, I found that the cushions and wood frame were still in great condition, so I wouldn't have to do anything with those (thank goodness). I used the old "leather" as a pattern for my new cloth and cut out the shapes. As I began to stable on the microsuede, I realized that the "leather" must have had some magical stretching quality that allowed it to create crease-less folds along the edges of the seat. I was having no such luck with my fabric and had to resort to very careful, controlled pleating. 

Almost finished stapling the microsuede in place
Poor Teako ended up leaving the room after the first seat was done (remember, there were THREE of these to do) because of the loud staple gun. Also, my hand muscles were...so SO very sore the next day from all that stapling. Ouch.

Dust cover back in place. Note the pleating job.
So three seats and a sore back/neck/hand later, I ended up with these beauties:


I just LOVE how they turned out...so much more lux and soft. It definitely matches the decor of the rest of the living room as well (which you haven't seen yet...I'll get there!).

And a little before/after action:


Oh, and don't be sad for chair #3. He flits around the apartment being various things such as a bag holder, a pants holder, an end table, and generally looking pretty handsome.
So there you have it: my first reupholstering job. And probably as difficult as I'm going to get since the thought of digging into something like a sofa gives me the jeebies.

My First Ikea Hack

So my apartment has come a long way since those empty photos you saw in this post (things happen when you live in a place for 6 months). So the next several posts are going to be a somewhat chronological presentation of projects I've um...managed since moving here.

I have a love/hate thing with Ikea products. I love how cheap and modern-looking they are, but I also hate how cheaply made and COMMON they are! Seriously, everyone has an Expedit shelf or a Lack table somewhere. Speaking of which....*blush*...so I bought a Lack TV console/table thingy. Here's what it looks like in the catalog:

Looks like a Lack. But it had clean lines and I was desperate to get my TV out of a box on the floor. I decided to try to pump up the sophistication level by replacing the legs with the ever-popular Capita legs from Ikea.


It was pretty simple from here. Instead of attaching the Lack legs, I simple marked where I wanted these guys to go and screwed them in.
Using the original leg as a measuring unit.


I chose to bring the legs in toward the middle more for a hint of mid-century retroness (that's what they're calling it these days, right?). And here's the final product:


Not bad, not bad. The wood still looks fake as all fakiness, and it's quite a bit deeper than I wanted, but it works. Here's what the area looked like before Boyfriend moved in:


I do believe almost everything in this photo is from Ikea (bad Stephanie, BAD!!). I'm working on it. I also still have to do something about those wall-warts on top...yuck.

Post-Boyfriend, the TV is now huge (though it works), the plants have died, and just yesterday two ENORMOUS black speakers moved in, courtesy of Boyfriend's parents. They are just...so big and SO black. I cried a little when I saw them in place...literally (I'm not joking). Pictures to follow. I've been Googling non-stop for ideas on how to hide monster speakers without cutting holes in the wall and stashing them in there. So if you have any, please. Help me.

Thursday, March 10, 2011

First Cali Apartment

I was lucky enough to find a brand-new, clean, lovely apartment in Berkeley (albeit at a hefty price) in the short amount of time I had to do the hunt. After living in old college-town apartments that were 50 years old and had had the same carpet since....I don't even want to know when, it was time to be an adult! (Did I mention that my last apartment was set on fire because of smokers who lived right above me? Awesome.)

Anyway, here's the new place when I first moved in:

Living room & kitchen. Got a free paint job on that accent wall!

Kitchen with island

Apartment dishwashers are rare around these parts. So are washers and dryers. I have all three!


View from the kitchen
Bedroom
Bedroom again (there's only one)

View from the balcony. Right above the fountain!


View of the courtyard.

Oddly, I didn't feel compelled to take a picture of the bathroom. It's just as lovely and clean as the rest of the apartment though (and spacious!).

What's great about my new place is that I'm the first person to live in this unit, which means there are no holes in the wall, no dusty baseboards, no "mystery" stains, no broken shit, no chipped/scratched/peeled things....yay!  It's right down the street from some cute shops, including and art supplies store, Crate & Barrel and C&B's little--but more modern sister-- CB2. I <3 everything at CB2 and I always try to visit when I walk by (they even allow Teako inside)!

So there's the tour. The place has undergone quite the transformation since this, so stay tuned.