Showing posts with label lighting. Show all posts

Monday, August 12, 2013

Home Office Part 2: Bye Bye Beige

This is what the office looked like as of last week. Adios, soul-sucking beige!


This weekend was supposed to be a deep-clean-and-collect-paint-chips weekend in Apartment Therapy's Style Cure schedule, but Sherwin Williams had a 30% off sale last week and what's a girl gonna do, right?

I knew I wanted to do a medium-tone gray so I gave the two I already had a try. The first color we used in the living room/hallway (I think it's called "Simply Greige" from SW) and the other was "Pavestone" from SW. One was too light, the other was too dark, and both were too warm. I was actually really bummed out about this because it was the last day of the Sherwin Williams sale and I had come down with a cold, which left me greasy-haired, mucus-filled and in no mood to go running errands. You're welcome for that mental image.

Long story short, my deal-loving Asian side won out against my weak and sickly Caucasian side, and I returned from the store with two gallons of "Requisite Gray".


Sunday, September 23, 2012

Pink Bathroom Chronicles: Vanity Light

Catch up!
Part ONE: Medicine Cabinet
Part TWO: Cabinet Demolition
Part THREE: Shelves

I've avoided including the bathroom vanity light in my photos up to this point because, you guys....it is disgusting.

Disclaimer:

DISGUSTING

Ready?
...
Don't have any food or drink in your mouth....
...
Okay here we go....


Wait, it gets worse...


Don't hate me. I warned you.

As you might have deduced, I wanted to replace those lights immediately. At this point, I had about $18 left of the $100 budget my landlady had given me, so online shopping I went. Craiglist failed to produce anything under $20, and the big box stores were even worse. For something halfway decent-looking, I was expected to spend between $30-70!

Then I started thinking, what about that inexpensive, magical cure-all, holy patron saint of do-it-yourselfers: spray paint? That's when I googled and found this blog where the author has almost the EXACT same light fixture and did exactly what I was thinking about doing to it!

I grabbed a can of metallic Rustoleum (stops rust!) spray paint at the hardware store, but failed to find a good deal on glass lamp shades. The old ones can stay for now.


(By the way, if you spray paint anything ever, you should most definitely have one of these attachable grips. Your hands will thank you.)

I started by taking down the light fixture (cutting power to the bathroom to be safe) and taping off the threads. Then I sanded off all the rust, which was a task I had seriously underestimated because it took about 30 minutes and a lot of elbow grease. Once I got that all smooth, I wiped it clean and got ready for paint. Below is a picture mid-paint because I forgot to take a photo of my freshly sanded surface. You get the idea.


Few things are more satisfying than a nice smooth coat of spray paint.


I chose not to use primer for a couple of reasons. Firstly, my can of primer did not sport the "stops rust!" badge, and I really did not want the rust to come back. Secondly, I like instant gratification and I wanted to see the shiny results right away.

When I went to install it (again, cut that electrical), I decided to flip it upside down because I never liked seeing those spiral florescent bulbs. 


This had an interesting effect on the bathroom, which Boyfriend noticed immediately when he turned on the lights. Pointing the bulbs upwards created more ambient light around the room and brightened up the ceiling, making the room seem bigger and higher. This was a big deal for our tiny bathroom.


So that's how I updated our disgusting vanity light for the cost of a $6 can of spray paint!

I'm ALMOST done with this bathroom. I've been putting the finishing touches on the shelves and accessories, so look forward to the big reveal in the next post!

Tuesday, March 20, 2012

Under Cabinet Lighting

We hit the landlord jackpot with our current ones. They're cool with us doing a variety of home improvement projects and will even fund them. Score, right?

Our most recent proposal was to put in some much-needed under cabinet lighting in the kitchen and we were given the green light hours within sending the email. It was on.
So the thing about our kitchen is that when they remodeled it, they didn't take into consideration the fact that 1) it is a small room and 2) it has very limited natural light. Thus, they went with dark-stained cabinets and dark counter tops. And while it all looks very sophisticated, it basically kills any light that might have survived with a brighter color scheme. Additionally, the main source of light is a directional track lighting fixture, which throws five little spotlights in different directions (casting a shadow on whatever you have in front of you) and doesn't bounce any light off the white ceiling.

So yeah, under-cabinet lighting was seriously needed. Let's take a look, shall we? Here's the before


And the after:


And here's a shot with the track lighting off so you can see just how much illumination the under-cabinet lighting provides on its own. Pretty amazing right?


Here's an example of the shadow-casting issue I mentioned at the top. Here is a typical dish-washing scene without the under-cabinet lighting. You can clearly see how the track lighting casts harsh shadows exactly where you don't want them to be. Probability of fully clean hand-washed dish: 60%


And with the under-cabinet lights on. Probability of fully clean hand-washed dish: 98% (of course now you can see our dirty sink...ahem, please excuse)


Going into the project, we knew it was going to make a big impact, but we didn't realize just how huge. I mean, look at the difference! We can SEEEEE!

Now on to the installation. Step one: PLAN THE CRAP OUT OF YOUR PROJECT. You think I'm kidding (I don't know how you could since I used all caps), but even with our excessive planning, we still ran into many snags and minor game-changers. I can only imagine the disaster had we not planned things out. Here's a sketch (which we sent to the landlords) of our proposed layout.


We found these kickass waterproof flexible LED strips on Amazon that you can cut into multiple lengths, have adhesive backing, and come in a waterproof sleeve. All that was required was a little electrical work, which I will describe in a bit. We opted to use these sweet LEDs for several reasons: 1) They are extremely energy efficient and don't give off heat, 2) They provide an even spread of light rather than the pools that you get from puck lights, 3) they are incredibly versatile with the trimable lengths and free-style wiring, 4) they are very thin and are easily hidden from view, and 5) did I mention that they kick ass?

Time to gather supplies! Soldering iron and solder. I recommend a pointed tip for precision, because this is delicate work.


LED strips. We chose the ones with the waterproof sleeves to reduce the risk of electrocution, either by water contact or just by touching the open connections.


Power supply to make it all light up and whatnot. Here we've already mounted it to the underside of one of the cabinets with a couple of screws


You'll also need electrical tape, drill, screws, scissors, pliers, and some sort of switch (we used a wireless one with multiple hubs, so it also controls the outdoor string lights we recently hung).

That shiny stuff is champagne from our house-warming party. Boyfriend opened a bottle, which then
proceeded to explode all over the kitchen. We've been cleaning it up ever since.

Once we had run through our plan several times, we measured our LED strips (several times) and cut them to the correct lengths. Each stretch of cabinet was going to have two rows for added brightness. We drilled holes in the cabinets where we would need to thread the wires which we chose to do in order to hide all the wires from view, even when the cabinet doors were open.


Inside a cabinet: this wire will be pulled tight and hidden from view

Once all the wires were in place, we proceeded to link up the LED strips with a little soldering action. At each cut, there were two tiny dots where solder would adhere to. These were marked with positive and negative symbols to help us keep them straight.

Adding solder dots for faster application of wires

Here is one end of an LED strip with the completed connection. We tried to make our solder connections as clean as possible so that the two currents would NOT MAKE CONTACT. Otherwise we could have some serious electrical issues (like electrocution or fire)! Test your work after making each connection to make sure the circuit is complete (our test was very sophisticated and involved us yelling "Stand back! Don't touch anything!!! Ready?? *plug in*").


Then we closed everything off by wrapping some electrical tape around the open end and wires. This also helped to prevent the positive and negative wires from touching (note: generally red=positive and black = negative, but it doesn't matter as long as you are consistent throughout your circuit and never mix them up)


Time to stick it! I gently peeled off the paper backing and made sure the sticky tape stayed stuck to the LED strip and not the paper.


Then we pressed the LED strip firmly to the wood (don't forget to CLEAN the wood surface first!)


This was probably our best connection of the bunch. No extra wire slack and nice clean connections. Of course it was the last one we did. I guess practice makes perfect!


And we're done! While it was a pretty involved DIY, it wasn't a complicated one. Lots of planning, measuring, and researching ensured that our f***ups were minimal. Let's see the final results again....oooo prettyyyyyyyyy.


Now for the budget breakdown. These are the raw materials needed and do not include tools such as soldering iron, solder, tape, etc. Note, the prices on Amazon are constantly changing so here is what we paid.

NOT BAD for something that can cost $300 and up for a professional to install!  I would not hesitate to do this again in another kitchen!


Tuesday, January 24, 2012

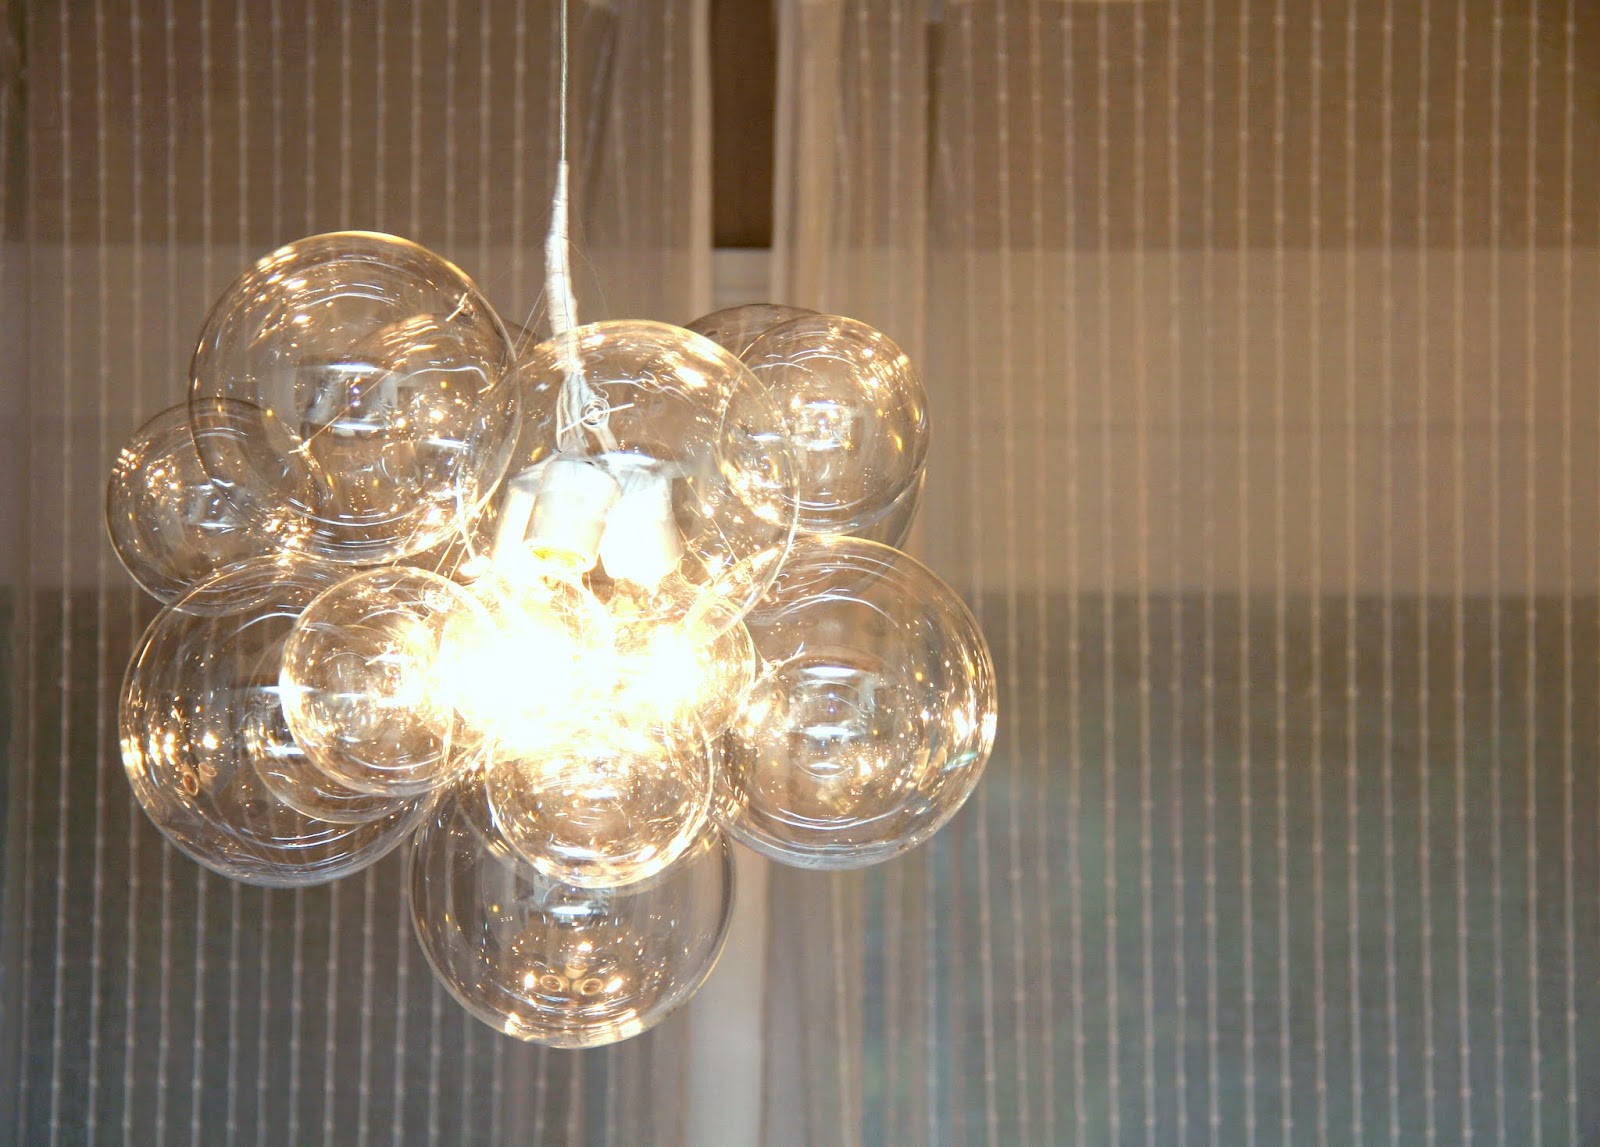
Bubble Ball Chandelier

OMG....I think this is one of my favorite DIY projects to date. Check it out:


HAWT. It's a glass bubble ball chandelier! Isn't is gorgeous?  

So in the last dining room update I mentioned that finding or making a chandelier was on the to-do list, because the pendant light that came with the house was, um....small. Observe:


We first spotted the bubble chandelier's likeness on a trip to CB2, where it was hanging in the store with no price tag.  I loved it, but Boyfriend was so smitten that he jumped on the computer as soon as we got home and googled it.  What he found was that a designer named Jean Pelle originally came up with this whimsical lamp in 2008 using glass spheres from CB2.  The best part about it is that she was originally featured in Readymade magazine, which included the FULL step-by-step DIY tutorial, huzzah!  In this post I'll be doing a step-by-step that focuses on the changes we made and clarifying some of the more vague parts in the tutorial. Also note that I said "we". Yes, Boyfriend and I teamed up on this one and it was just like being in college architecture studio again (minus the all-nighters and self-loathing)! 

FIRST we started by gathering materials. 
  • 8 large and 6 small bubble balls (CB2) - $47
  • 4" clear light bulbs (Amazon.com) - $15
  • 3 porcelain sockets with exposed wires (any hardware store) - $10
  • Canopy kit (any hardware store) $6
  • Lamp cord (cut to desired length) $1
  • White electrical tape - $3
  • Clear fishing line - already had
  • 14 white-coated paper clips - already had
  • Thin cotton string - already had
  • TOTAL COST: $82
NOTE: This was our first serious electrical project with real electrocution potential, so we did a lot of research before diving in and I recommend you do the same.  

I started off by screwing some light bulbs into their sockets and padding them with paper since I would be handling them a lot during the wiring process. I did this to allow the bulbs some room, but in hindsight this probably wasn't necessary. 

Now the important thing to remember when dealing with wiring is to put all the blacks with the blacks and the whites with the whites. That's right, it's electrical segregation! Your lamp wire will also have two wires that may or may not be colored. In my case, I went for a clear lamp wire which did not have the helpful colors, so I just had to remember which side was which (marking with a Sharpie helped). One of these will connect to your bunch of black wires and the other connects to your white ones. I gathered my wires together and stripped the plastic casing from the tips. I twisted these together and wrapped them with electrical tape. I also wrapped the black wires with my white electrical tape.


We both agreed that the cotton string macrame in Pelle's version threw off the balance of the design. The bubble cluster looks so beautifully weightless, so we wanted our version to reflect that. This is why we chose the single clear wire as our only support.

Once I had my cluster of light bulbs assembled, it was time to hook it up to the power. This video was very helpful in explaining how to change out a ceiling canopy (I only needed the first half since I wasn't installing a dome light.


Listen to the man and TURN OFF THAT ELECTRICITY before you stick your hands anywhere! Boyfriend did the honors and once we were sure the power was off, he unscrewed the old canopy took down the wee pendant lamp. We hooked up the new soon-to-be chandelier, making sure to trace the black line and white line through the clear wire, covered it with our new silver canopy and switched the power back on. I'll admit, there was a moment of uncertainty while I waited for Boyfriend to turn the power back on where I was covering my eyes for protection and clutching a fire extinguisher. Nothing happened though, other than the lights turning on beautifully! *phew*

Now we were finally ready to start hanging up some bubble balls. Instead of the acrylic rods that the recipe calls for (you can find these on Amazon, but note that 1/4" rods will be too big to fit through the holes in the bubble balls; go for 1/8") , I went with white-coated paper clips bent into the shape seen below. I used a fishing knot called a "trilene knot" to secure the fishing line to the paper clip (I'm not a fishing knot expert by any means, so I went with what seemed sturdy+easy to tie).


I used the same trilene knot to secure the other end to the lamp cord. You'll notice here that I've wrapped the "business area" where all the wires connect with very thin cotton string (over the electrical tape). The reason for this is two-fold: 1) it keeps the various loops of fishing line from sliding down and 2) it will help hide the stray ends of fishing line when everything has been hung (more on that in a bit).

Here's some progress. Four large bubble balls have been hung! I highly recommend two people for this part, one to hold the ball in place and the other to tie it to the cord. (If you're wondering where my black wires went, I wrapped them with white electrical tape too).


(Can you already tell that those sconces need to go? We didn't mind them before, but they completely don't match our uber-modern chandelier now.)

So once we secured all 14 of our bubble balls, it was time to clean up this mess:


As you can see in the above photo, I left myself a generous length of string at the top and have begun to wind it back down around the cord. As I work my way down, I will hide any fishing line ends under the string. This process is delicate and tedious, so be careful! Mine ended up being decent...it's not the prettiest thing in the world--lumpier than I would like--but it does the job.

So that's how we did it! Here it is in the room:


And a little before-after action:


<3